(photo from Rowan)
As I was setting up the armhole steeks on my
Orkney cardigan this morning, I thought I could write a quick post about converting a pattern written in pieces (flat) to in the round. So, this is a fair isle (stranded) sweater, obviously. Traditionally, fair isle sweaters were knit in a circular fashion for several reasons:
- most people have a slightly different tension when they perform a knit stitch versus a purl stitch, so knitting all of them avoids this
- when you're using two or more strands of yarn across a row it is generally easier to be knitting (vs. purling) as you do so
- when you're following a chart, it's easier to see the pattern as it appears on the right side of the work if you're facing it all the time
- if you knit many colours flat in pieces you have a million ends to weave in at the end. With a steek you just cut them all off
So I'm not sure, quite honestly, why certain pattern companies choose to write such patterns in flat pieces (I'm not anti-pieces generally at all. I love seams for many many situations. Just not here). In any case, this leads me to my topic which is converting such a pattern to in-the-round. It's pretty straightforward.
I knit the sleeves first because the good knitters of Ravelry who had knit this before me had left notes about gauge / sizing issues (it ran on the small side), I knew generally what my gauge is in Felted Tweed and working it stranded and knew I needed to go up a needle size. Using my sleeve as my gauge swatch, I cast on the required stitches for the cuff and then once I knew where I was headed size-wise, did a few more increases to get me up a size. Anyway, I worked the sleeves in the round until reaching the decreasing for the sleeve cap, at which point I bound off the underarm stitches, then cast on 7 steek sts to bridge the gap on the next round. I carried on, decreasing on either side of the steek to the top. (Note: you need to cast on sts for the steek by alternating the two colours you're working with, so they both travel across.)
This is the sleeve cap with the steek.
Then I reinforced the steek sts and cut it open. (There are still a million ends to weave in in the sleeves below the steek. Unavoidable on sleeves.)
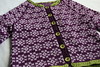
On to the body. I added together the number of sts to cast on for both fronts and back, cast them on and at the end of the first round cast on 7 steek sts. I worked the body, adding button holes to the right front, up to the underarms. This morning I looked at my notes to see how many right front sts I had, worked across to 7 sts less than that, bound off 7 + 7 for the back (14 under arm total as per my size), then did the same on the other side. On the next round I started my armhole decreasing on either side of those bound off sts, casting on 7 steek sts in between.

Now I'm going to continue working up the armholes, decreasing as I go, until I reach the front neck shaping. Since the pattern says "work the front until you're 26 rows shorter than the back" I had to calculate how high 26 rows is in my gauge and subtract that from the height of the armhole. Also, the buttonholes are worked out by having you knit the left front first, determine where you want buttons, then do the holes on the right accordingly. As I couldn't do that, I took the total height of the front to the neck and determined how many rows apart 9 buttons needed to be. And used the photo as a guide.

Here's the body, with its steek on the right and the start of the arm steek on the upper left. Once I reach the neck shaping I will work another steek so I can continue to the shoulders in the round. Then I'll bind off everything, sew the shoulders together and work the collar and buttonband facings. As this sweater doesn't have buttonbands but inside facings I'll need to trim my steek sts right down, but it should be fine.
I'm doing this as a KAL with my friend Liz and I love every minute I work on this. I'll be sad to be finished, except I'm really looking forward to wearing it. I did so much yardwork yesterday I can barely move my arms, but hopefully I can do some more knitting today. Happy weekend!